
How to Repair a Roof Leak: Step-by-Step Guide
by Editorial Team
Table of Contents
- How to Find a Roof Leak
- Temporary Steps After Discovering a Leak
- Understanding the Roof Leak Repair Process
- DIY Roof Leak Repair vs. Hiring a Professional
- Roof Leak Repair Warranty and Long-Term Protection
- Preventing Roof Leaks Before They Start
- Roof Leak Repair Costs and Getting an Estimate
- Frequently Asked Questions
Last Updated: October 9, 2026
How to Find a Roof Leak
The first step in addressing a roof leak is locating it.
Finding the leak requires patience and systematic inspection. Start during or immediately after rain, when water is actively flowing; dry conditions make leaks nearly impossible to spot.
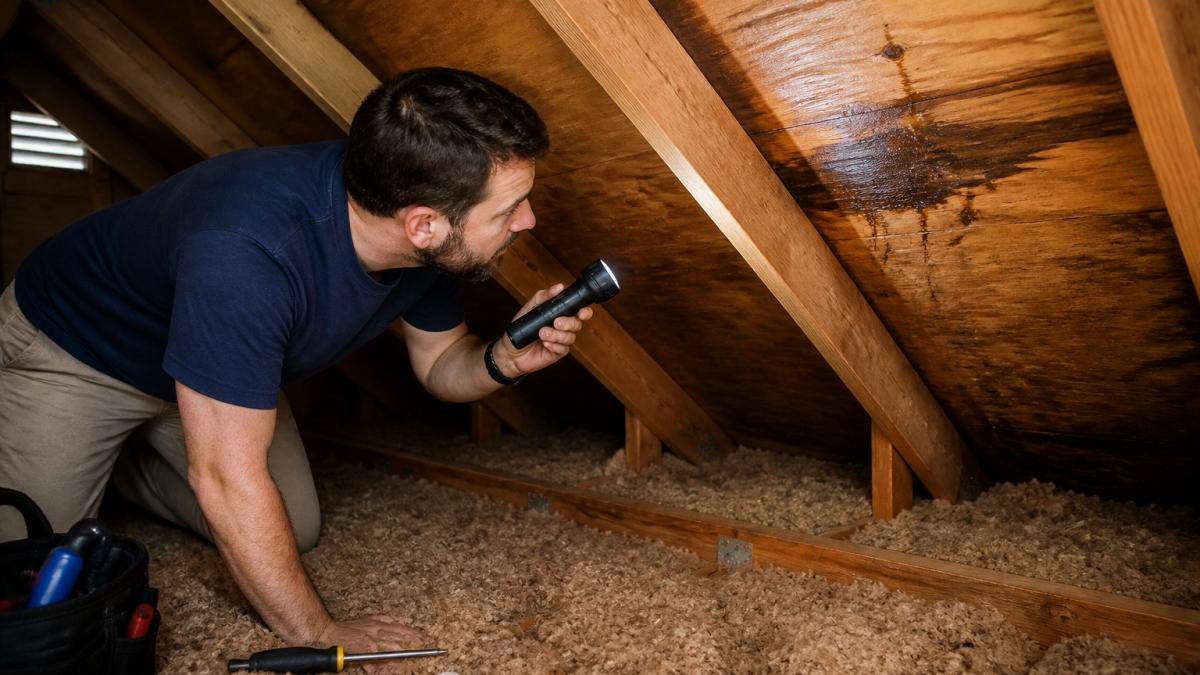
Inspect from Inside During Rain
Begin in the attic or crawl space above the stained area. With a flashlight, look for active dripping, wet insulation, or dark streaks on framing, these point toward the leak's origin.
If you can safely access the attic during rain, watch for water entering the roof deck and mark the spot with tape or chalk.
Once you've narrowed down the general area, move to the next step of your roof leak repair process.
Check Roof Surface and Flashing
Flashing, the metal or rubber strips sealing joints where the roof meets walls, chimneys, or vents, is the most common source of roof leaks.
Look for:
- Gaps or separation between flashing and the roof surface
- Rust or corrosion on metal flashing
- Cracked or missing sealant around the flashing edges
- Lifted or curled shingles near the flashing
Check shingles for cracks, missing pieces, or granule loss (dark specks in gutters signal worn shingles). Wind, hail, and age all compromise shingle integrity.

Examine valleys, where two roof slopes meet, as water concentrates there during heavy rain.
Temporary Steps After Discovering a Leak
Once you've confirmed a roof leak, act immediately.
Manage interior water. Place buckets under drips, absorb pooling water with towels, and improve circulation with fans.
Document the damage. Photograph water stains, wet insulation, and any mold growth. These images support insurance claims and help contractors gauge the problem.
Temporary measures are not permanent solutions. Schedule a professional inspection within 48 hours to assess the full scope of damage and plan lasting repairs.
Understanding the Roof Leak Repair Process
Roof leak repair involves more than filling a hole, it accounts for surrounding material, the leak's cause, and long-term seal durability.
Damage Assessment and Repair Planning
A professional inspection determines whether you need a simple repair or section replacement. The contractor evaluates the leak's size and location, surrounding material condition, whether it's isolated or part of a broader failure pattern, and your roof's age and remaining lifespan.
Small leaks from isolated flashing failures often qualify for targeted repair. Larger breaches, clustered leaks, or widespread shingle damage may make replacement more cost-effective than repeated repairs.
Repair Methods by Roofing Material
Different roofing materials require different repair approaches. Knowing your roof type helps you anticipate what the repair involves.
Asphalt shingles: The most common residential roofing material. For leaks around penetrations, professionals use roofing cement or specialized sealants that bond to wet or dry surfaces, even underwater conditions.

Metal roofing: Standing seam or corrugated systems need careful sealing at seams and fasteners.
Built-up or tar-and-gravel roofs: These older systems are patched with new tar and aggregate.
Single-ply membranes (EPDM, PVC, TPO): Rubber and plastic membranes are sealed with specialized adhesives or heat-welded seams.
DIY Roof Leak Repair vs. Hiring a Professional
Small, accessible leaks suit homeowners with basic tools. Larger leaks, steep roofs, or structural damage require professional expertise and safety equipment.
DIY repair is suitable when:
- The leak is in an easily accessible area (low-slope roof, near an edge)
- Damage is confined to flashing or a small shingle area
- You have experience working at heights safely
- The underlying roof structure shows no rot or deterioration
Hire a professional when:
Geocel RP-400® Wet-Dry Surface Roof Cement →
- The leak is on a steep pitch or high roof
- Multiple leaks suggest widespread failure
- Water damage has reached framing or insulation
- You're uncertain about the leak's cause or extent
- Your roof is under warranty (DIY repairs may void it) Securing your home against immediate water intrusion requires careful execution of emergency repair steps until a qualified contractor can arrive to perform a permanent fix.
Professionals bring diagnostic tools, safety equipment, and the ability to judge whether repairs will hold or replacement is needed. Their insurance protects you if something goes wrong.
Roof Leak Repair Warranty and Long-Term Protection
A warranty is only as good as the company behind it, so verifying your contractor matters as much as reading the terms. This is the step most homeowners skip, and where expensive mistakes happen.
What a Repair Warranty Should Cover
A written repair warranty typically addresses three things:
- Workmanship, defects from improper installation, sealing, or flashing.
- Materials, failure of the products used, under normal conditions.
- Scope, the specific area repaired, and whether the warranty covers only that area or the surrounding roof.
Ask for the warranty in writing before work starts, and confirm whether it's transferable if you sell. A non-transferable warranty has less value to a future buyer.
Verifying a Local Contractor Before You Hire
The verification steps are local and concrete:
- Licensing. Check your state or local licensing board to confirm a current license for the scope of work. Requirements vary by jurisdiction, verify rather than assume.
- Insurance. Ask for a certificate of general liability and workers' compensation coverage, and call the insurer to confirm it's active. If an uninsured worker is injured on your roof, the liability can fall on you.
- References. Ask for recent local references and call them. Ask specifically whether the repair held through the next storm season.
- Physical address. A legitimate local contractor has a verifiable business address. Be cautious of out-of-area crews that appear after storms and vanish before warranty claims.
- Written contract. Never rely on a handshake. It should state scope, materials, timeline, payment schedule, and warranty terms.
Protecting the Repair Long-Term
After the repair, a little maintenance keeps the warranty valid and the roof sound:
- Keep your paperwork. Store the contract, warranty, and before/after photos together for a claim or home sale.
- Inspect after major storms. Check the repaired area and surrounding flashing for lifted edges or new gaps.
- Maintain drainage. Clear gutters and valleys so water doesn't back up under the repair.
- Don't void the warranty. Many warranties bar DIY repairs on the covered area. If something looks wrong, call the contractor first.
A repair backed by a verified local contractor and a written, transferable warranty beats a cheaper job from someone you can't reach when the next storm hits.
Preventing Roof Leaks Before They Start
The best roof leak repair is the one you never need.
Annual inspections: Check shingles, flashing, and valleys twice yearly (spring and fall), by walking the roof or using binoculars.
Clean gutters and downspouts: Clogged gutters force water to back up under shingles.
Trim tree branches: Overhanging branches drop debris, shade the roof, and promote moss and algae.
Seal flashing properly: Flashing is your roof's most vulnerable point. Keep sealant around it intact and flexible; standard caulks crack and fail within a few years, so use products designed for the job.

Address ice dams in winter: In cold climates, ice dams form at the roof edge when melting snow refreezes.
Roof Leak Repair Costs and Getting an Estimate
No two roof leaks price the same, the number is driven by access, materials, and how much surrounding material must come up to reach the failure point. Knowing those drivers lets you sanity-check any bid.
What Actually Drives the Price
- Access and pitch. A walkable low-slope roof is far cheaper than a steep, multi-story roof requiring harnesses, staging, or a lift.
- Leak location. A penetration or flashing failure near a ridge, chimney, or valley takes more labor than an isolated field shingle, since the repair ties back into more layers.
- Materials. Matching discontinued shingles, sourcing a specific membrane, or replacing a metal panel section costs more than standard asphalt repair.
- Hidden damage. Once the roof is opened, rotted decking, saturated underlayment, or wet insulation add scope, the biggest reason a final invoice exceeds the estimate.
- Emergency calls. Weekend and storm-response visits typically carry a premium over scheduled work.
Inspection and Diagnostic Fees
Many contractors charge a diagnostic fee, and some waive it if you approve the repair, ask up front whether it's credited toward the work. A thorough inspection should include an attic check, since interior evidence often reveals leaks the exterior doesn't.
How to Read a Written Estimate
A usable estimate itemizes rather than lumping everything into one number. Look for:
- Labor and materials listed separately, so you see what you're paying for.
- The specific repair method, tear-out and replace, patch, re-flash, or seal, not just 'fix leak.'
- Permits, if your jurisdiction requires them.
- Cleanup and disposal of old materials.
- A stated warranty with its length and coverage.
Comparing Bids Without Getting Burned
Get at least three written estimates and compare line by line, not just by the bottom number. The lowest bid often omits decking replacement, skips permits, or uses a sealant that won't survive the material.
Be wary of any contractor who quotes a firm price before inspecting the attic or roof, pressures you to sign on the spot, or asks for full payment up front.
How Insurance Fits In
Most homeowner policies cover sudden, accidental damage, a wind-driven branch, hail strike, or storm that lifts shingles, but not deferred maintenance or a worn-out roof. If you're filing a claim:
- Document the damage with photos before any repair begins.
- Keep receipts for temporary measures like tarps and any emergency work.
- Get the adjuster's assessment in writing before authorizing permanent repairs.
- Understand that the insurer pays based on covered damage, and you're responsible for your deductible and any non-covered scope.
A contractor experienced with insurance claims can document damage in the format adjusters expect, reducing the chance of a disputed or reduced payout.
Frequently Asked Questions
How can I tell where a roof leak is coming from?
Start by looking for water stains on ceilings and walls inside your home, these mark where water enters, not necessarily where the leak originates. Water travels along roof structure and framing, so the actual damage may be several feet away from the stain. Inspect your attic during daylight or with a flashlight to trace the water path upward. Check flashing around chimneys, vents, and skylights, as these are common leak sources. On the roof surface itself, look for missing or curled shingles, cracks, debris, or separation in seams. If you cannot locate the source safely, hire a professional roofer for a thorough inspection.
What's the difference between repairing and replacing a roof?
Roof leak repair addresses isolated damage, missing shingles, cracked flashing, or small holes, and costs significantly less than replacement. Repair extends your roof's life when damage is contained. Roof replacement removes the entire roofing system and installs new material, necessary when your roof has reached the end of its lifespan (typically 20-30 years depending on material), has widespread damage, or repeated leaks across multiple areas. A professional inspection determines whether your roof leak repair process requires a simple fix or full replacement based on the roof's age, damage extent, and remaining durability.
Can I temporarily stop a roof leak until a roofer arrives?
Yes. Place a bucket under the leak to catch water and protect your interior. If you can safely access the roof, apply a temporary patch using roofing cement or a self-adhesive patch kit over the damaged area. For wet surfaces, use a product engineered to cure underwater and bond in damp conditions, such as Geocel RP-400 Wet-Dry Surface Roof Cement, which seals quickly even on wet or partially submerged surfaces. Temporary repairs buy time but are not permanent solutions. Schedule a professional inspection and repair as soon as possible to prevent water damage, mold, and structural deterioration.
Is a roof leak covered by homeowners insurance?
Most homeowners insurance policies cover roof leak damage caused by sudden, accidental events such as storms, hail, or fallen branches. However, damage from age, wear, poor maintenance, or gradual deterioration is typically not covered. Your policy may have a deductible you must pay before coverage applies. Document the leak with photos and contact your insurance company promptly to file a claim. Some insurers require a professional inspection or repair estimate before approving claims. Review your policy details or speak with your agent to understand your specific coverage and any exclusions.